"Let's model me a mine"
M.E.G.M.S.
Mining & Exploration Geological Modelling Services
How to insert a new boundary
In Normal Mode
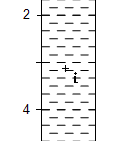
- Move the mouse cursor to be within the borehole field at the depth at which you want to insert the new bounday.
- While holding down the Alt key click the left mouse button.
Using Edit Modes
- Enter Insert Mode (use the F6 shortcut key, select
Insert under the
Tools menu, or click the Insert Mode toolbar icon
 ).
). - Move the mouse cursor to be within the borehole field at the depth at which
you want to insert the new boundary.
- Click the left mouse button.
Notes
When inserting a boundary, the depths at which the new boundary can be positioned are limited by the current Depth Tolerance - at small display scales (zoomed into the borehole) or with large depth tolerances the position of the boundary may be noticeably different from the position of the mouse cursor. You can watch the current depth shown at the bottom of each borehole field, or turn on display of the Ruler to get a preview of what the actual depth of the new boundary will be.